Brooklyn

Kefir Two Ways

Kefir is hands down one of the best ferments for supporting the gut! While fermented dairy kefir is about 98% + lactose free some people still have a hard time digesting dairy. You’ll need to obtain Kefir Grains in order to make your kefir. We suggest ordering grains online from Cultures for Health or GEM Cultures .

With that in mind here is how we do Kefir both with dairy and without dairy! Make sure to read our notes at the end about keeping your grain cultures happy and healthy!
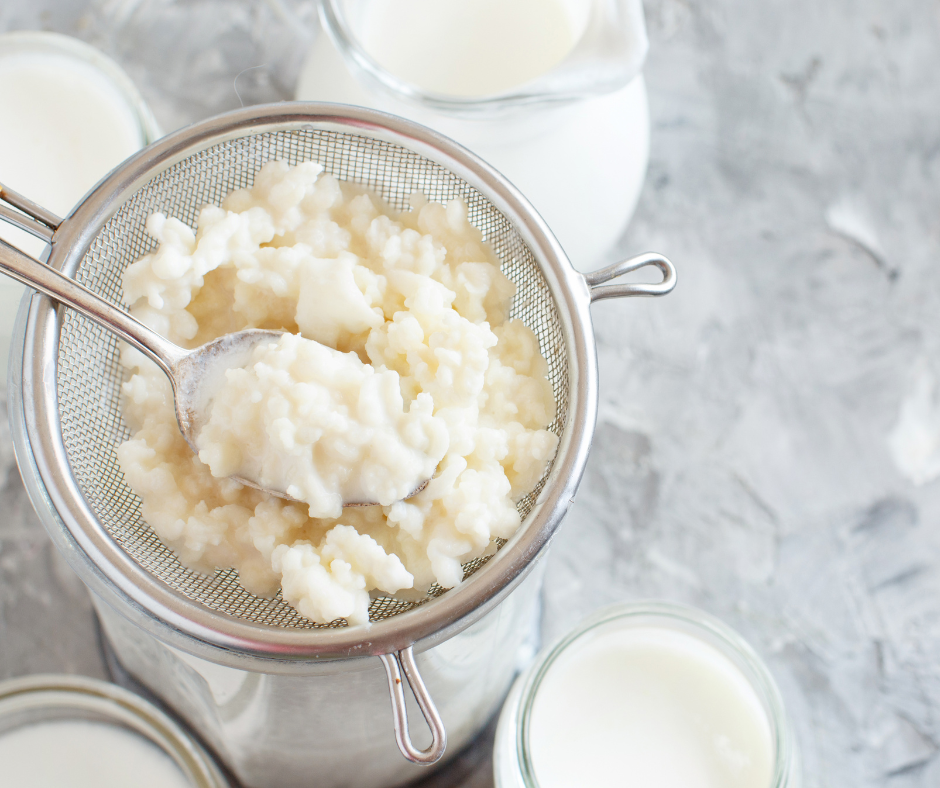
MILK KEFIR (DAIRY)

Ingredients

  • 1 tablespoon kefir grains

  • 8–16 ounces of milk (Goat or Cow: Organic, Non-Homogenized, and Raw are best.)

Instructions

  1. Add 1 tablespoon kefir grains to 8–16 ounces of raw milk in a jar with a lid. 

  2. Let it sit on the counter at room temperature for 24–72 hours depending on how sour you like it. You can taste it to check.

  3. Shake a couple times a day to keep fresh nutrients available to the grains.

  4. Strain the milk so you can keep the kefir grains to make a new batch.

  5. Put the strained kefir in a jar with a tight lid and keep it out of the fridge for a few hours. This will increase fizziness.

NOTE: The grains multiply. You can share them with friends or keep growing more. They work better if you keep them outside of the fridge. If you need to take time off from kefir, you can place them in some fresh milk and then put them in the fridge indefinitely. Once you are ready to use them again, rinse them off and begin the process from the beginning.

COCONUT KEFIR (NON-DAIRY)

Ingredients

  • 1 Tablespoon kefir grains

  • 8–16 ounces of full fat canned coconut milk or you can get young Thai coconuts and use the water and scrape the pulp and blend to make your own coconut milk

Instructions

  1. Use the same recipe for original milk kefir; just replace the dairy with coconut milk. 

NOTE: Make sure to put the grains in dairy milk every 2–3 batches to keep them happy and healthy.


Macadamia Nut Tasty Paste

One of our favorite ferments is this quick Tasty Paste or you could also call it a Nut or Seed Miso. Swap out for whatever nuts you like! We love to add it to Fermented Vegan Cheeses, spread it on Toast, make a light noodle broth, use it in a Fermented Cashew Cheesecake and more. This is also one of the recipes we contributed to the book Miso Tempeh Natto by Kirsten & Christopher Shockey. We are honored to be one of their Meet the Makers and to have gotten to share some of our favorites with you!

Macadamia Tasty Paste

Makes: 1 pint 

Ingredients: 

  • 1 cup macadamia nuts 

  • 1/2 cup koji 

  • Sea salt 

Instructions: 

To start soak your macadamia nuts overnight. (Or 6-8 hours) 

Put your koji in a bowl and hydrate with 1/4 cup of water. Mix well so everything is hydrated. 

Strain your soaked macadamia nuts. 

Put your nuts and koji in a blender or food processor with a little fresh filtered water to help it blend to a toothpaste consistency. 

Add 1.2 teaspoons sea salt and mix well. 

Move the blended mixture to a small jar making sure to tap or press out any big air bubbles or pockets. Be sure to leave 1/2 to 1 inch head room as we’ve found the nut misos to be especially active in a short amount of time. 

Put a lid on the jar and label it with its contents and the date. This is a quick ferment 3-5 days and you’re set. You can also go longer to have a more mature nut miso. In that can we suggest you coat the jar with a very thin coat of sea salt like you would with a longer Bean Miso ferment. 


Screen Shot 2018-11-14 at 10.38.43 PM.png

Shio Koji

Shio Koji in short means “ Salt Koji.” You take koji, salt, and water and let it sit for around 10 days. What I find most interesting about the Shio Koji process is that salt actually kills the Aspergillus oryzae. Lucky for us, it’s enzymes remain and when you throw into the mix the carbohydrates and sugars that exist in grains and by creating the right fermentation environment you are able to grow some solid bacteria. What does this mean for us? We have this amazingly tasty, umami, bacterial goodness that we can use to create other fermentations or secondary fermentations.

Here’s a list of some of our favorite uses for Shio Koji:

  • Shio Koji cured meat

  • Shio koji in handmade pasta (a lovely trick we learned from Ourcookquest)

  • Sauces & Marinades

  • An alternative for soy sauce

  • Alternative ways to make pickles

Here’s our recipe for Shio Koji :

2 cups koji

2 cups water

1/8 cup salt

Mix together well and move to a jar with a finger tight lid. Let it sit in a cool and dark place for 10-12 days. Every day you’ll want to stir or shake the mixture. When it’s complete you can opt to blend the mixture or leave it in it’s original state and then move it to the fridge. Shio Koji can be used for 6 month from the date of making — so make sure you date it.

IMG_8665.jpg

Miso. Tempeh. Natto. And other Tasty Ferments! Out on Pre-order

We’re pretty excited about this gem coming out in 2019! This is the third book by our good friends Kirsten & Christopher Shockey and we’re super excited that you find some of our Miso recipes in this gem! Get those orders in!

Screen Shot 2018-10-18 at 11.51.03 AM.png

Berkshire Fermentation Festival Presenter Videos

What a lovely weekend at the Berkshire Fermentation Festival! This was our third year back teaching and we’re happy to announce that the videos from all the presenters are now up online for you to enjoy!

Catch our Miso Workshop along with presenters Sandor Katz, Adam Elabd, Amanda Feifer, Anne Yonetani, and Alana Chernila!!

CHECK IT OUT HERE!

From the 4th Annual Berkshire Fermentation Festival, Cheryl Paswater talks about making miso.

Hoshigaki

Hoshigaki are a Japanese delicacy made by gently massaging persimmons while they air dry.
The persimmons used to make Hoshigaki are astringent varieties such as Hachiya. Ideally, choose fruit that still has part of the stem. We've used a couple different varieties of persimmons with nice success.

1) The first step is to cut the top off, while carefully leaving the stem that you will tie string to and they will hang from. And then use a knife of peeler to trim away the skins of the persimmon. Then attach the string and find a good place for your Hosigaki to hang. Broom handles work great for this, we've also used knitting needles, drumsticks and hangers to hang the Hoshigaki from.


2) The first week you just let the Hoshigaki hang and dry till they start to create a thin skin.  After a week has passed you begin to gently massage each persimmon every other day. Be careful not to break the skin.

3) As you keep massaging every other day the fructose in the fruit will begin to come to the surface. The "bloom" begins to appear...it looks like powdered sugar on your persimmons. Keep massaging until the persimmons are more like a dried fruit, changing into a darker color with the bloom, and then enjoy!

Hoshigaki

Hoshigaki

Fermented Cranberry Relish

I think a lot of people have a love hate relationship with cranberries. As the holidays have rolled around and Thanksgiving came I was thinking a lot about cranberry sauce and how I like it and yet I don't like it but, something in me wanted to redeem what magic cranberries do have so I took it to the kitchen and with the power of fermentation by my side decided to whip up a fermented cranberry relish and the result was a good one! I packed multiple jars for friends and family on a recent Thanksgiving trip to Virginia and Washington DC and it was a hit! Lovers of cranberries and non lovers alike enjoyed this tangy fermented gift. With the hollidays in full swing we hope you'll take a stab at this yummy ferment for the holidays.


Fermented Cranberry Relish

Ingredients:

  • Fresh cranberries (3 cups)
  • Dried cranberries (1 cup)
  • Ginger root (2 inch piece)
  • Sugar (3 tablespoons)
  • Sea salt (1 tablespoon)
  • Cinnamon (optional)
  • Walnuts (optional)

Take your cranberries and put them in a food processer and rough chop them. Move to a bowl and add a sea salt. Stir well to allow the brine to start coming out of the cranberries. Grate the ginger root. Add the ginger, sugar, and dried cranberries to the bowl. Mix well. Add cinnamon or chopped walnuts as an optional added bit of magic. Move the mixture to a jar and pack it down, add a weight to keep it submerged below the brine. Cover with a lid or towel and put in a cool dark place to ferment. We let our sit for about 5 days before harvesting.


IMG_2510.jpg

Cinnamon Fig Shrub

Shrubs! We first fell in love with shrubs on a trip to Portland, Oregon when we hit up the coffeeshop Barista and they had an amazing Fig Shrub based Espresso drink with some other magic mixed in. It was absolutely amazing and when when we got home we started making these easy and tasty drink mixers. We like them in bourbon, gin, seltzer, and more!

This is our Cinnamon Fig Shrub that we recently made after being asked by our friends Thomasin and Alex to make a drink mixer for their upcoming wedding. They wanted something that people could take away as a gift and that would be a nice mixer....so Cinnamon Fig Shrub it was! We love this delightful fall mixer and we think you will too! Note: if you save all those ends and tips you can use them to make a nice Fruit Scrap Vinegar which is what we did!

Cinnamon Fig Shrub

Ingredients:
Fresh Figs
Sugar
Raw Apple Cider Vinegar
Water
Cinnamon Stick (optional)

Directions:

    - Add equal parts of sugar and water to a saucepan, and heat and stir until the sugar dissolves.
    - Add figs and simmer until the fruit's juice blends well into the syrup.
    - Let it rest till it cools
    - Add vinegar to the syrup in a large (ideally glass) container
    - Cover with a lid or airlock and let ferment for 5-10 days
    - Filter your shrub through a strainer and enjoy!


Fermented Apple Pear Sauce

When I was a kid at basically every dinner there would be either applesauce or apple butter on the table. The apple butter usually came from the Amish farm or the local apple farm, and the applesauce...well, Mott's was what we had.

Thinking about my love of applesauce and over the years of hauling home a huge CSA loot of apples and pears I started making a slow cooker Apple Pear Sauce somewhere around September. Always the maker and always the person wanting to re-invent things I decided that this year we would do a few batches of Fermented Apple Pear Sauce to add to our fall goodies...promptly followed by Apple Cider Vinegar, Hard Cider, Cyszar, and a fall Apple Kraut.

Here's our recipe for our Fermented Apple Pear Sauce. Hope you enjoy it as much as we have!

Ingredients:

  • 5 medium apples and 2-3 medium pears
  • 2 Tbsp. water kefir
  • 1 1/2 tsp. ground cinnamon
  • 1/2 tsp. ground ginger
  • 1 tsp. vanilla extract
  • pinch of salt

Instructions:

  1. Chop apples and pears into chunks. Optional is to peel them -- we like them with peels on with the cores removed. Throw them into a food processor and blend until you get your desired consistency.
  2. Mix in water kefir, ginger, vanilla, cinnamon, and salt.
  3. Transfer to a quart jar, leave room for the ferment to do it's thing, we suggest 1 inch (or at the curve of the jar).
  4. Cover the jar with a cloth, lid, airlock, pickle pipe, or whatever method of your choosing.
  5. Ferment for 1-3 days until you reach a flavor and texture that you like. We suggest tasting it daily to see how the flavor profile changes daily. It's really the best way to learn how you like your ferments! Once you like the flavor, put a lid on the jar, and store in the fridge. We suggest eating within 1-2 months. 
IMG_2178.jpg

Pistachio Miso

One of my favorite things about winter is teaching Miso Workshops. We only teach Miso making in the winter since Miso is traditionally started in the winter months, so when it was time to start amping up for our winter workshops at the Brooklyn Botanic Gardens and Enlightenment Wines we went and started digging through our Miso stash to see what we wanted to share with our students. If you got a chance to make it to the NYC Fermentation Festival then you likely got to test out some of our Miso's there as well. From our Chickpea Leek Kelp Miso, Blackbean Miso, to our Cashew Miso we've been all about Miso this winter so we wanted to share one of our favorite recipes of late with you. We've be playing with nuts and seeds a lot lately and Pistachio Miso has become one of our favorites. A quick and easy ferment, guaranteed to be a nice accoutrement to any meal.

Here's our recipe:

1 cup Raw unsalted pistachios

1/2 cup Koji (rice or barley koji)

Sea salt

Instructions:

Soak the pistachios for 2-4 hours. Drain the excess liquid. Soak the koji in a few tablespoons of water while you prep the nuts and blender.

In a blender combine the soaked pistachios with the koji and 1 tbs of sea salt and blend into a paste. You will likely have to add a little filtered water while you blend. You ultimately want it to be a toothpaste consistency.

Take a wide mouth jar and pour the mixture into the jar, leaving room at the top, put on a lid and let sit for 2-4 days in a cool dark place.

We like to use this miso as a spread on baked fish, toast, as a soup, in salad dressings and more. We hope you enjoy it as much as we do!

Fermentation and the Human Microbiome Resource List

The First Annual NYC Fermentation Festival was a couple weekends ago here in Brooklyn, NY. It was a fantastic turnout and filled with amazing vendors, workshops, and more! Erin Cramm and I taught on Fermentation and the Human Microbiome this year at the festival and we wanted to share out list of favorite reads and more on this topic with you. So here are our picks and we hope you get a chance to enjoy them as much as we have!

Erin’s List:

I Contain Multitudes - Ed Yong

Food Rules - Michael Pollan

Gut - Giulia Enders

The Human Super-Organism - Dr. Rodney Dietert

Brainmaker - Dr. David Perlmutter

This is Your Brain on Parasites - Kathleen McAuliffe

The Gene - Siddhartha Mukherjee


Cheryl’s List:

The Art of Fermentation - Sandor Katz

Wild Fermentation - Sandor Katz

The Good Gut - Justin Sonnenburg

The Symbiont Factor - Dr. Richard Matthews

Cooked (Book & Netflix Series) - Michael Pollan

An Epidemic of Absence - Moses Velasques-Manoff

Missing Microbes - Dr. Martin J. Blaser


Check out the latest from us! The Art of Secondary Fermentation for Edible Brooklyn!


Wondering how to flavor your kombucha? Want to know how it's ready? Check out our recent article written by our Chief Fermentationist, Cheryl Paswater for Edible Brooklyn! Also, you can find us in February's Drink's Issue of Edible Brooklyn with a look inside our home fermentation station and more!


https://www.ediblebrooklyn.com/2017/secondary-kombucha-fermentation/


Ferment! Ferment!

Over the weekend was one of our favorite days for the year! The annual Ferment! Ferment! event in Brooklyn hosted and organized by the amazing Zack Schulman. Ferment! Ferment! is a celebration of all things fermented, for the beginner and the experienced fermenter, and nerds unite!  And you better like to eat because when you walk in and see the rows of tables of everyone's homemade concoctions it's impossible to leave without sampling everything!

There was another fantastic turn out this year and four amazing workshops put on by some fantastic fermenters: Sauerkraut with Angela Davis, Fermented Nut Cheeses with our very own Cheryl Paswater, Sour Beers with James Kinnie, and Kefir based drinks with Ken Fornotoro. There was a great crowd and great food -- so many highlights from Tempeh Pigs in a Blanket with Fermented Ketchup, Dosa, Fermented Cookies, Beer, Kimichi's, Herbal Kombucha's, and more. An event guaranteed to leave your gut and microbiome in a happy place.

Thank you to everyone who came out and makes this community such a special one because that's the thing that makes Ferment! Ferment! so amazing. Gathering our amazingly interesting and creative community together in the name of fermentation. Ferment ALL the things!!